česky | english
How to create CAcert client certificate with MMC of Windows 10
By alkas
Overview
Using system facilities and system repository of Windows 10, you can create a client certificate using the Certificates module of MMC. Then you can submit it to sign with the CA of CAcert. A certificate for a client will be created. You can export it, with the private key, into a PFX (P12) file, which can then be imported to another computer.
- Prepare the certificate module of MMC manage program to make the future certificate processing easier.
- Import two root certificates of CAcert.
- Create a Certificate Signing Request (CSR) following the "User" template.
- Submit the CSR to the CAcert CA, obtain the client certificate and store it (in the PEM format) into a CRT file.
- Import the certificate to the "Personal" certificates of the current user (you). Then it will link with the private key. You can use it in one or more computer(s) in their systems and client programs as web browsers (Internet Explorer, Edge, Firefox, Chrome,...), and e-mail clients (Outlook, Thunderbird, The Bat,...). What is important here, is the purpose of the client certificates - their use in client programs. The computer itself can be a PC, a laptop, a workstation, a server, a tablet, or a "smart" cell phone.
- If you need to use your client certificate on another computer, you will need to export the certificate with the corresponding private key into a P12-type file with PFX extension. You can import it to a target computer and/or client program. If the operating system is Windows, use the MMC certificate module, on tablets or cell phones opening the file is frequently sufficient.
Preparation
If you haven't worked with the MMC certificate module yet, it will be suitable first to create it and save it for future easy start. It is better to manage both your personal certificates and computer certificates – although you will work here with the earlier only.
Start the MMC managing console. From the "File" menu select "Add/remove snap-in...". Select the snap-in module "Certificates".
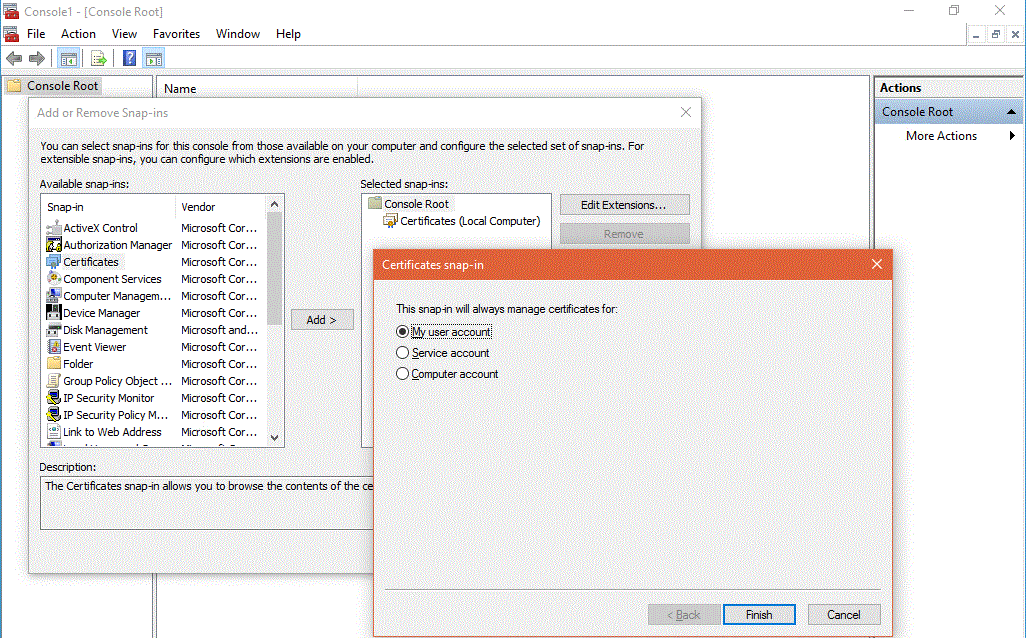
Select "Computer account" in the next dialog. Although you will not use this part in the following steps, it is suitable to include them for the possible server certificate management in the future.
From now on, you will deal with the client certificates only.
Select "Certificates" again and "Add". Specify "My user account" in the 2nd dialog this time.
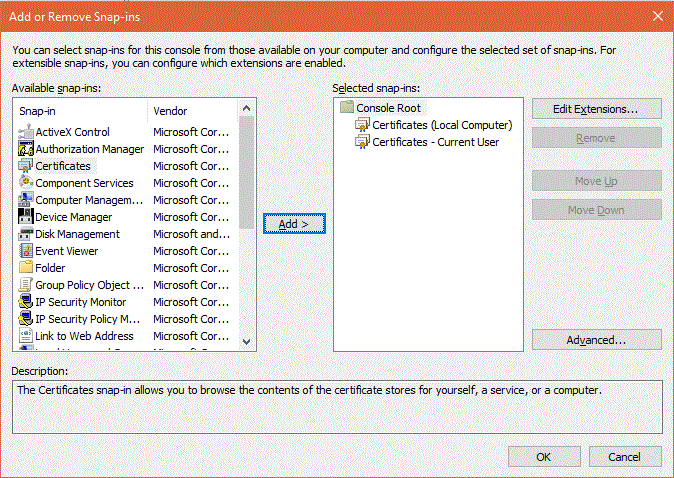
You can see the modules list here. Hit OK.
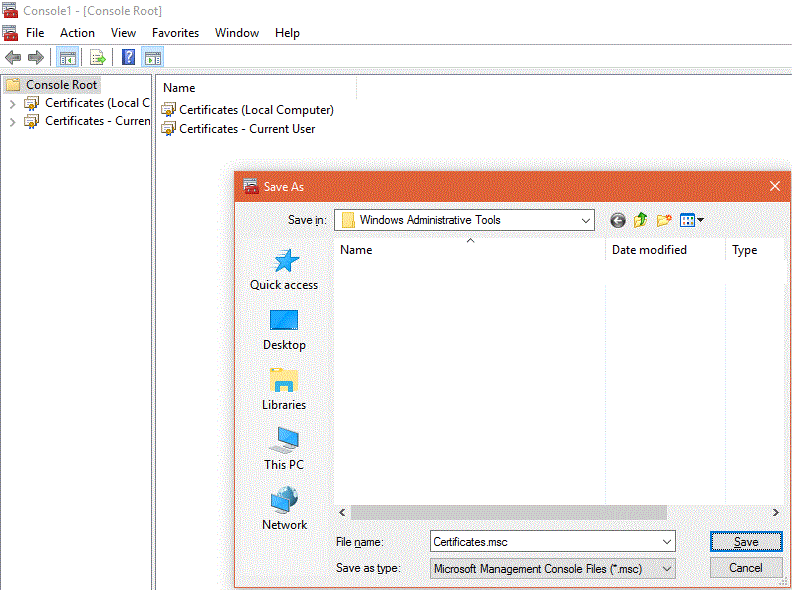
Save the prepared module (File, Save as...) under a suitable name. You may (possibly – if Microsoft will allow this again) run the module next time directly from the Administrative Tools.
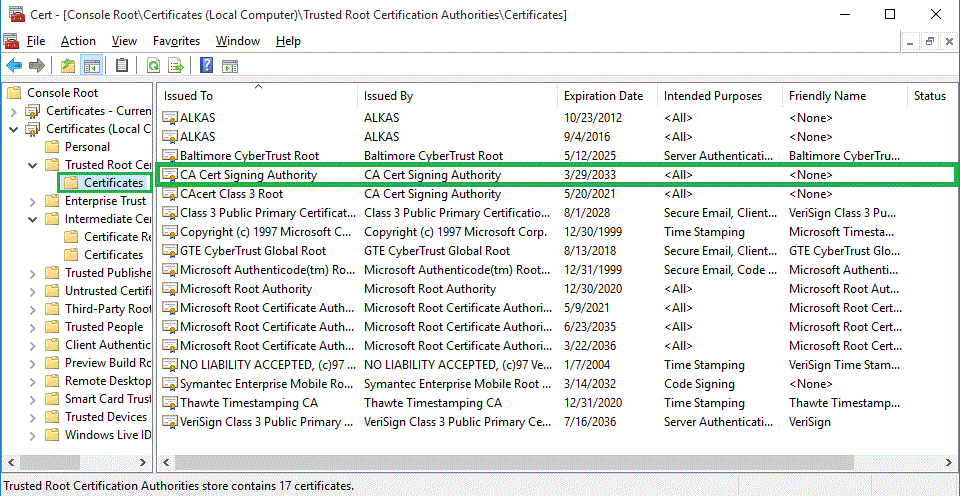
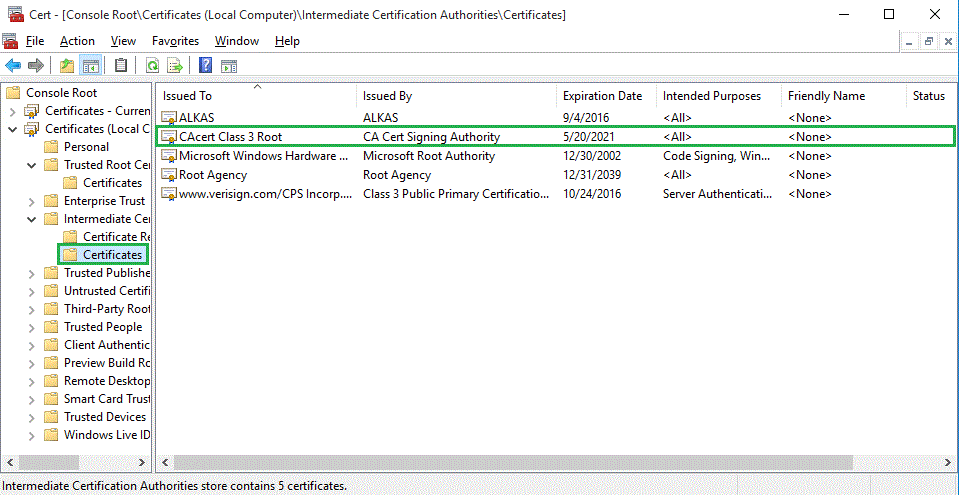
CAcert root certificates installing is the straightforward process. Display "Certificates" under the node "Trusted root certification authorities". Open its menu by right clicking to the "Certificates" node in the left pane tree, then select "All tasks..." - "Import...".
Select the downloaded file named "root.cer" (format PEM, from http://www.cacert.org/index.php?id=3) and import it.
Similarly, import the root certificate class 3 into the "Certificates" under the node "Intermediate certificate authorities" from the file "class3.cer" downloaded in the PEM format from http://www.cacert.org/index.php?id=3.
The two pictures above show the states after the import.
Creating a Certificate Signing Request (CSR)
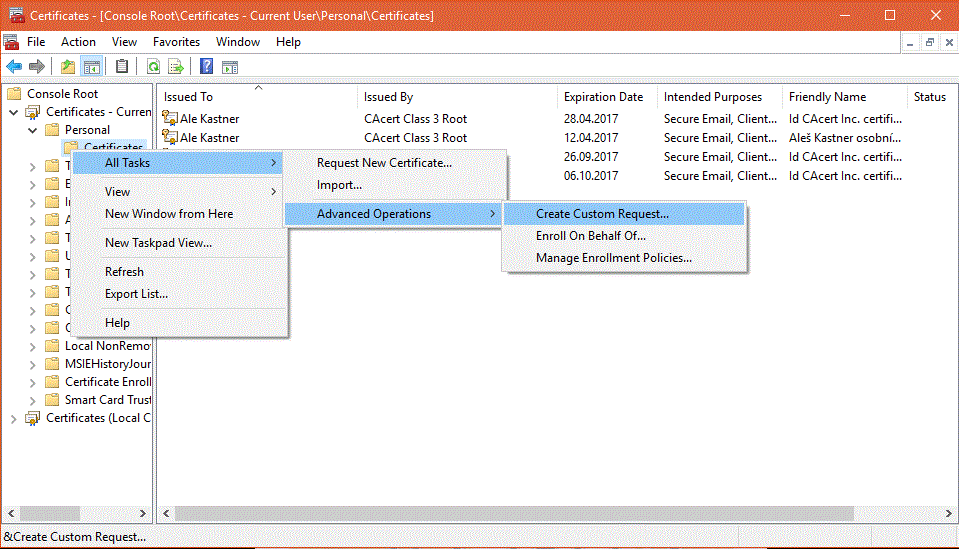
Select the "Certificates" node under the "Personal" node. Note that these certificates are "personal" for CURRENT USER (YOU), neither for another user nor local computer [you are dealing still in the "Certificates - Current user" tree!].
Open the menu with the right click and follow the picture. You have to select "Create Custom Request" to be able to select the user template. A wizard will start. Skip the first informative page (Next).
You can set policies on the wizard's next page. Skip that page, too.
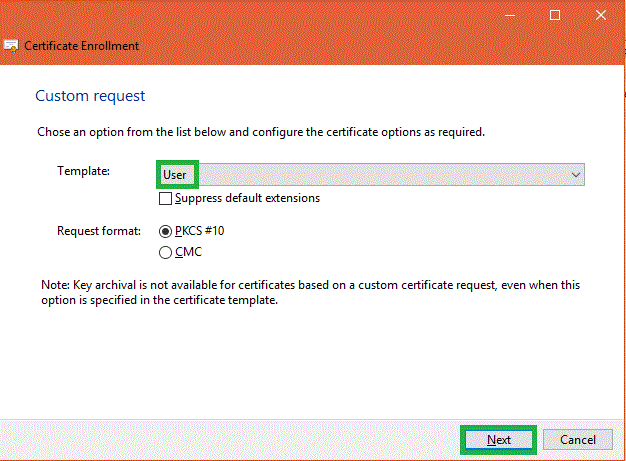
Select the "User" template on the next wizard's page. Hit "Next".
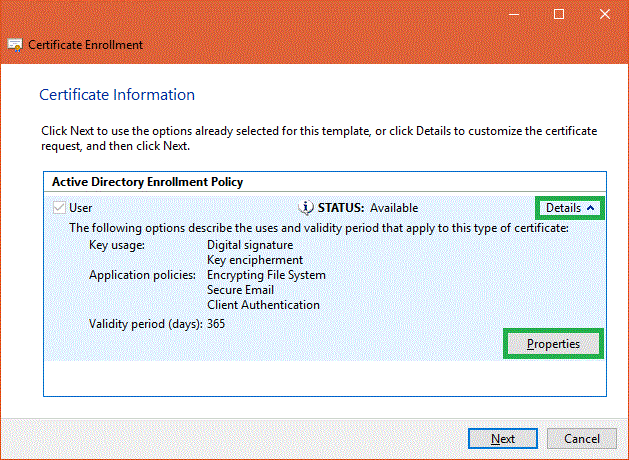
On the next page, open "Details" and press the "Properties" button.
If the amount of your Assurance Points is 50 or more, you can get client certificates valid for 24 months. The CAcert CA's signing server will sign your CSR. It will also delete all information except the following you have to supply:
- the public key, which is generated by your computer together with the private key,
- the Common Name - can be your name or e-mail you are known in Internet with; here CN=,
- alternative e-mail addresses, if desired; CAcert checks the validity of the domain(s) in your account at CAcert web,
- the algorithm for key creating (select RSA),
- the length of keys (minimum 1024 bits, select recommended 2048 bits).
By pressing the "Properties" button you will display a dialog, where you can set the last four parameters (see above).
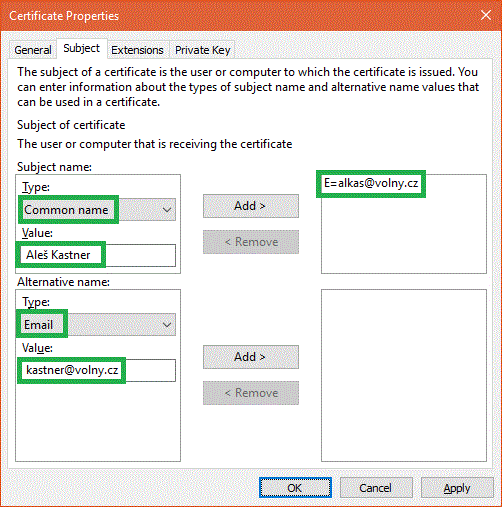
"Subject" tab: set the Common Name - e.g. your name and your e-mail address (on the upper right list). You can add your alternative e-mail addresses one by one into the lower right list of the dialog.
Now you are finished with this tab. The Common Name of this e-mail address is  and its alternative name equals to the address
  . However, CAcert's certificate issuer will use e-mail addresses and optionally your name from your account.
Continue with the General tab.
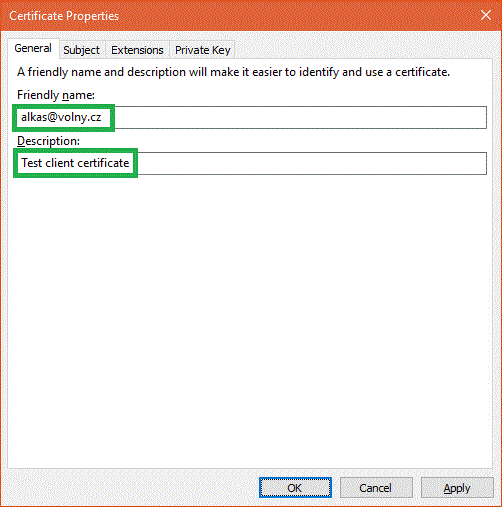
"General" tab: You need to fill the "Friendly name" with the main e-mail address.
The "Extensions" tab is pre-filled from the user template, so you can skip it.
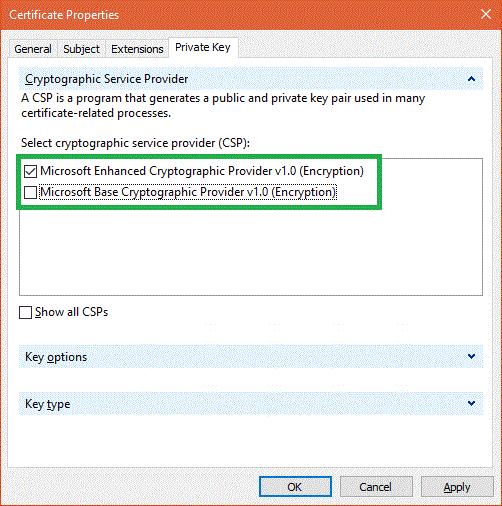
"Private key" tab: open the "Cryptographic service provider" and select "Microsoft Enhanced Cryptographic Provider v1.0". This enables the key size selection, see lower.
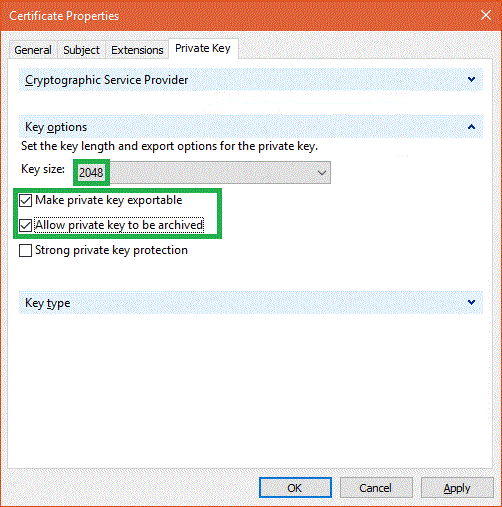
Now open the "Key options" tab, set the key length (at least 1024 bits; CAcert recommends 2048 bits), and set also export and archiving options for the private key.
Finally, press OK.
Continue with creating the CSR - continue the wizard.
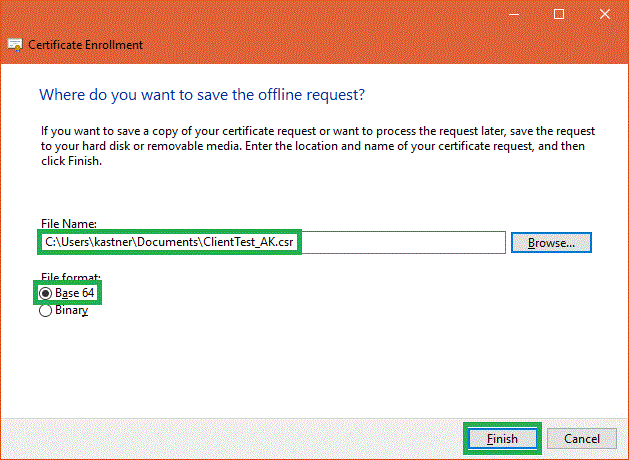
Enter a path with filename, where the CSR will be saved. Select the file format. Base64 coding means the conversion of binary data to characters, therefore it is recommended, as you will need to copy it from the CSR file and paste it to the page of CAcert's web server.
CSR will be saved into the file entered after pressing the "Finish" button. The CSR created this way is only a template with a public key, and CAcert's issuer server will complete it filling in the validated data from your account.
CSR submitting and getting the certificate
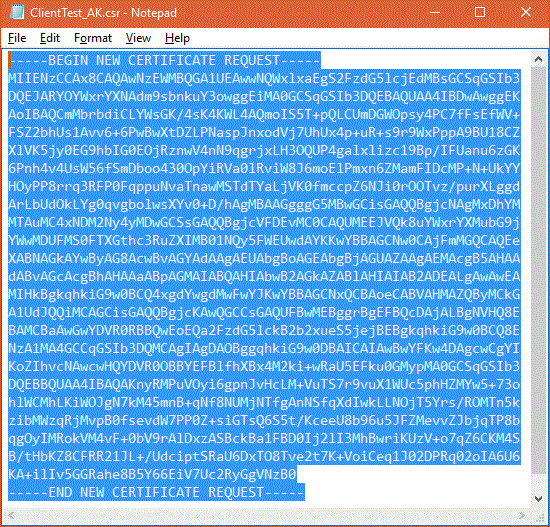
Open the file with your CSR in Notepad. Select all the contents and copy it to the clipboard (Ctrl-A, then Ctrl-C).
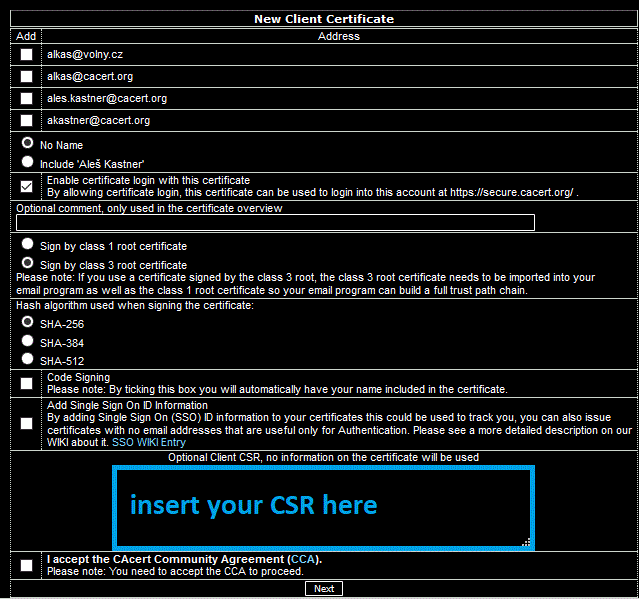
Login to your CAcert account and select "New" from the menu "Client certificates":
Use the large text box "Optional Client CSR...". Paste the CSR contents (Ctrl-V) in that box. Enter a comment into the "Optional comment" box above; it will identify your new certificate in the list in your account only. Select your Email address(es), choose inserting your name.
Don't forget to claim your agreement with the CAcert Community Agreement by checking the box below. Press the "Submit" button.
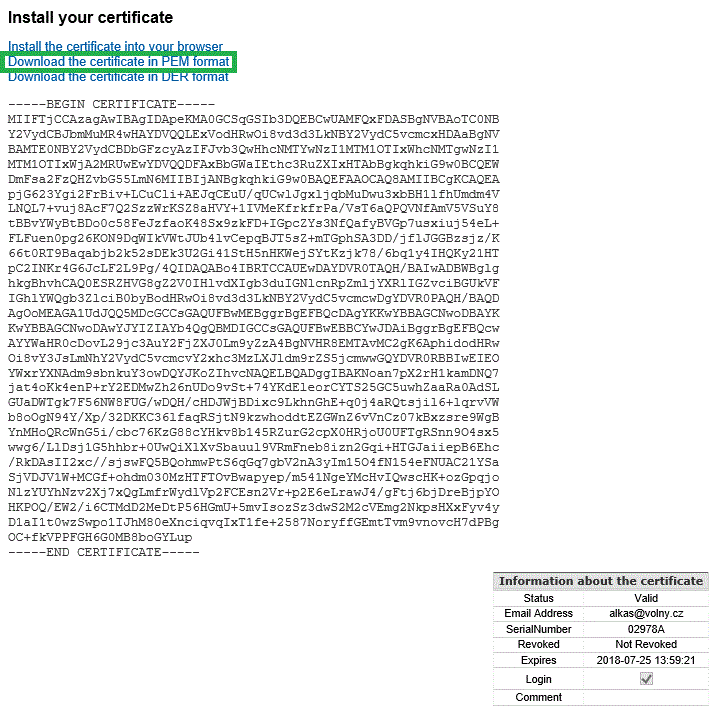
CAcert issues your client certificate. You can download it in the PEM format (.crt file suffix) or in the DER format (.cer suffix). Remember that the certificate does not contain the private key as it remains on the computer, where your CSR have been created.
Suppose that you have downloaded the certificate in the PEM format into the file with .crt suffix. Now, you need import the certificate into the operating system (Windows 10). Again, use the MMC administrative utility, the "Certificates" module. When importing, the appropriate private key associates with the certificate.
Importing the certificate into the operating system
Return to the "Certificate" module of MMC. Import your new certificate from the .crt file, adding it to "Certificates" under the node "Personal" (however the "personal" of the Current user).
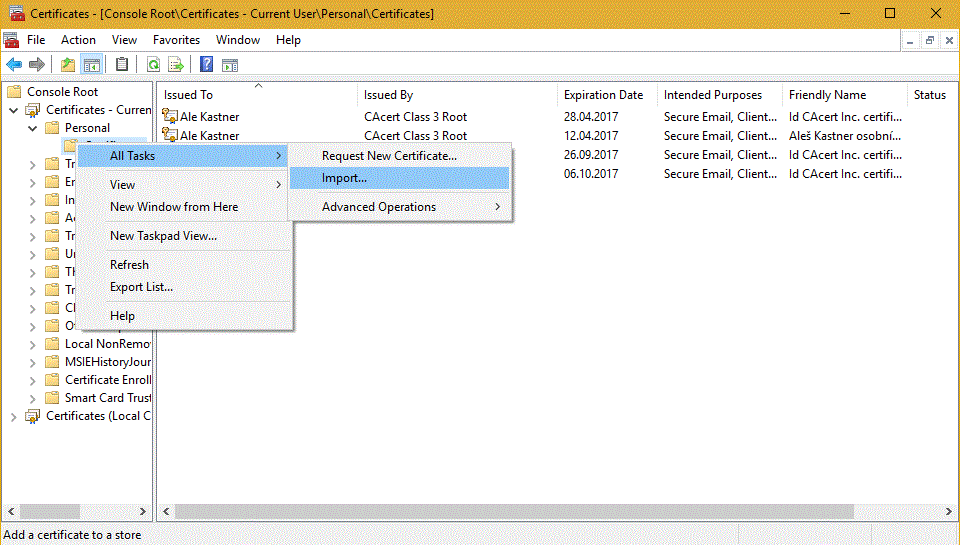
Right click "Certificates" under the node "Personal", and select "All tasks - Import..."
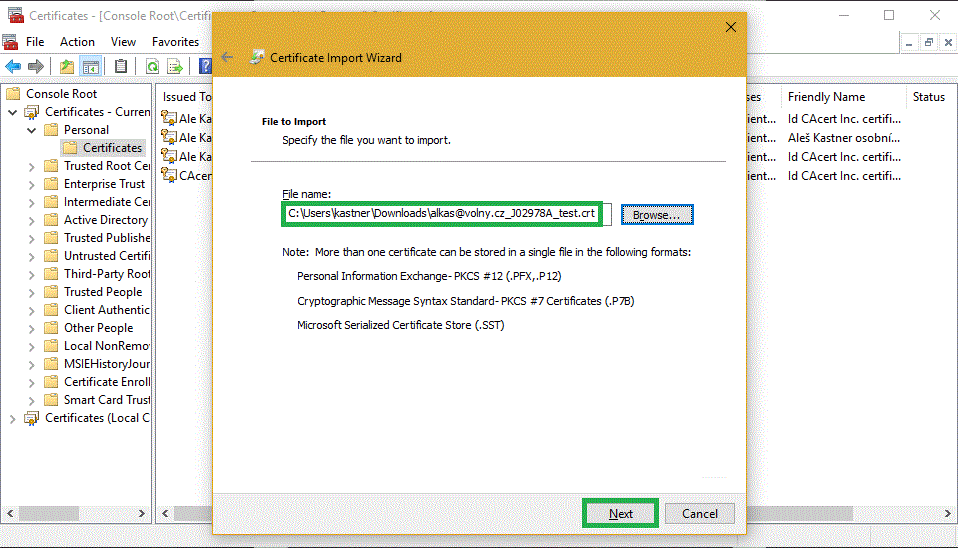
The import wizard appears. Skip the initial page, select the file containing the new certificate, and import it into the operating system after pressing the "Next" button.
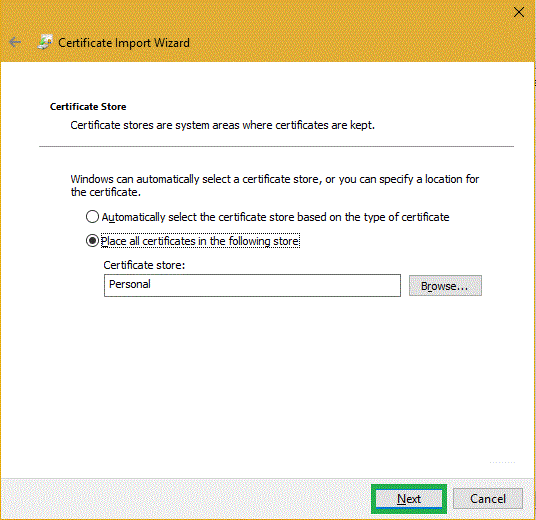
The repository for your personal / client certificates is already preselected. Press "Next" button.
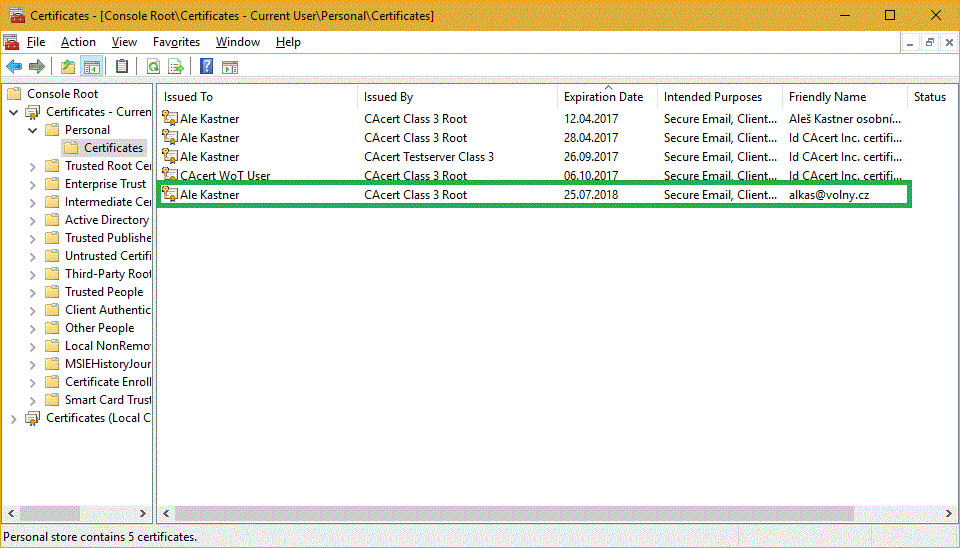
The system should report the successful import. After you confirm the message with OK, you will see the certificate imported. Note the icon of the new certificate - a golden key appears on its top left. This means that you have the private key belonging to this certificate (and the certificate itself contains the corresponding public key).
Export or backup the client certificate
You may export a certificate with corresponding private key to a P12-formatted file with the PFX suffix. This way you can make backups, but you can also transfer a certificate with corresponding private key to another computer, tablet, cell phone etc., and also to the client programs having their own certificate repository, as the web browser Firefox and e-mail client program Thunderbird.
Display the menu through right clicking on the certificate item. Select „All tasks“ - „Export“.
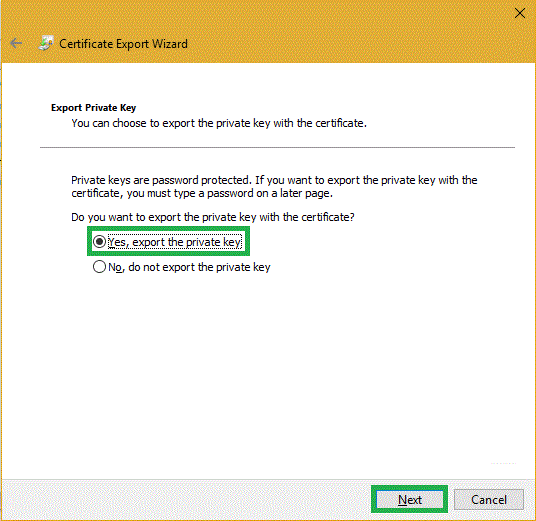
An export wizard appears. You will need to make an important decision on the second page. Selecting the private key export, you also select the output format P12 (.pfx suffix) and the whole process of the export at the same time. Press the "Next" button.
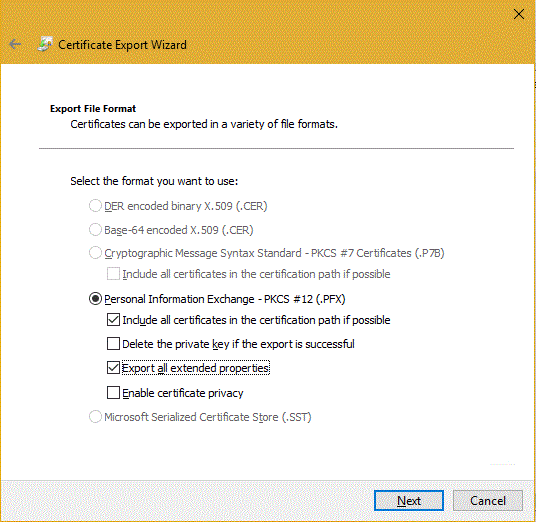
The PKCS 12 (P12) formatted file with the PFX suffix is already preselected. You can add more useful options, as suggested (see the picture). „Include all certificates in the certification path...“ enables to import also root certificate(s) of the CA from the resulting file (CAcert in this case).
„Export all extended properties“ is set rather for to be sure.
You surely don't wish to „Delete the private key if the export is successful“, as you need to keep the posibility for the certificate to work, if you want to transfer it from the computer, you have created the certificate (with the CSR) on, to another computers / cell phones / tablets...
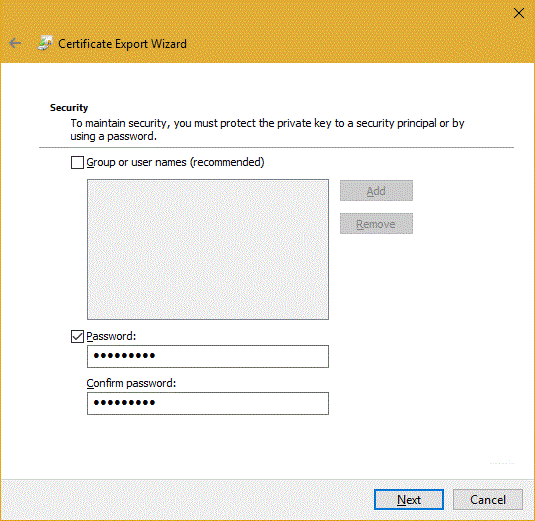
Select and enter your password twice. (Groups and usernames belong to the concept of the Microsoft Active Directory [AD], do not use them here). Continue with the "Next" button.
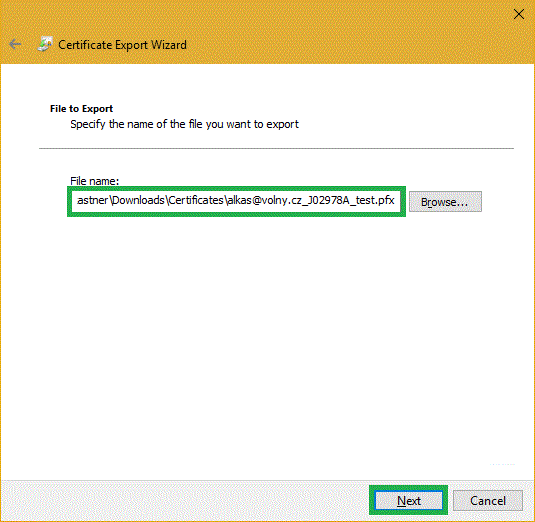
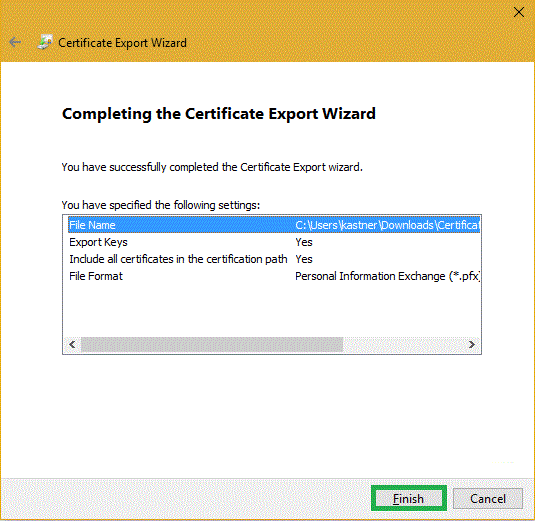
Enter the path and filename of P12-formatted file with the .pfx suffix, where the certificate and the private key will be saved. After pressing the "Next" button a summary will be displayed. Then (after hitting "Complete") the confirming dialog appears. Press OK.
You can import the client certificate and the private key on a different computer (e.g. laptop) by transferring the PFX file and importing from it.

